How to set up your new iPad the right way

Congratulations — you got a new iPad! Whether it’s a high-tech marvel of a new 9.7-inch iPad Pro, the beastly 12.9-inch iPad Pro, a perfectly capable iPad Air 2 or “just” an iPad mini 4, you’ll want such set up your new iPad with the least amount of fuss.
We’re here to help you do just that with a ton of little tips and tweaks that will make sure you’re off and using that new iPad as quickly and easily as possible. From backing up your old iPad (if you had one already) to getting up and running with a brand-new iPad from scratch, we’ve got you covered.
Still wondering which iPad to get? Check out our handy iPad buyer’s guide, as well as our breakdown of the two Pro models.
Initial setup
Automatic Setup for iPad
Automatic setup works if both your devices are running iOS 11. Automatic Setup lets you copy across your Apple ID and home Wi-Fi setting from another device, just by bringing them close together.
If your old iPad (or iPhone) is already running iOS 11, you can put them next to each other, follow the prompts, and avoid having to type in your Apple ID and Wi-Fi passwords. This makes the initial setup much smoother.
Restore
If you’re looking to backup your old iPad to transfer its apps and settings to your new one, be sure to check out our tip on using iTunes and your Mac to get the best backup possible. Before you do that, though, you might want to get your older iPad ready for the backup and restore, as in this article here.
If you’re starting from scratch, you don’t even need your Mac any more to set up a new iPad. Simply pull it out of the box, strip all the plastic protective coating from the iPad, and press the Home button.
Photo: Rob LeFebvre/Cult of Mac
Swipe across the Hello screen to begin the setup process. Then follow the screens, one by one, to get everything all squared away. Choose your language, then your country or region. You’ll next be prompted to choose your wi-fi network and enter the password for it. Enable location services with a tap, and then set up Touch ID – you can skip this step to set up later or not at all, as well. As with the iPhone, you simply touch the Home button sensor with your thumb, lifting it and re-touching it down a few times, then adjust your thumb’s position, and do it again. Follow the prompts and you’ll be just fine.
Next, you’ll enter a passcode, which is now a six-digit number. If you want to use a shorter four-digit one, or a password/phrase, tap on Passcode options at the bottom of the screen. Otherwise, type in your six digits and then do it again to confirm.
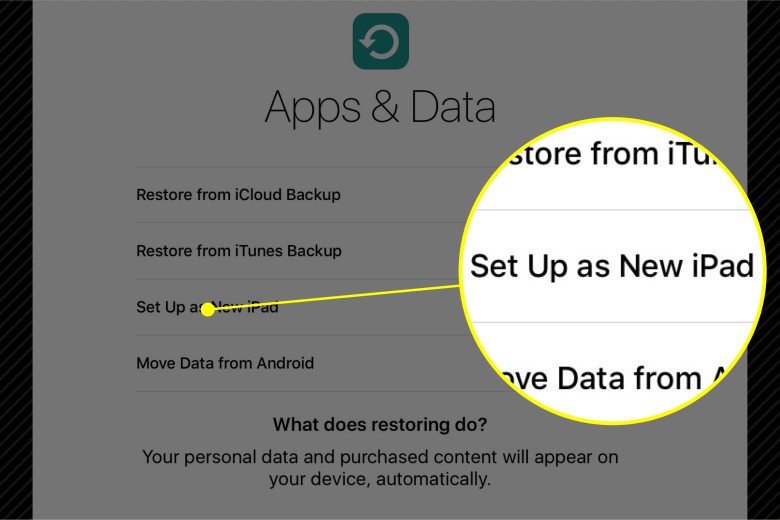
Photo: Rob LeFebvre/Cult of Mac
If you backed up your old iPad to iCloud or iTunes, choose one of those Restore options on the Apps & Data screen. Choose Set Up as New iPad if you’re starting from ground zero, or Move Data from Android if you’re coming over from the dark side (and good for you!).
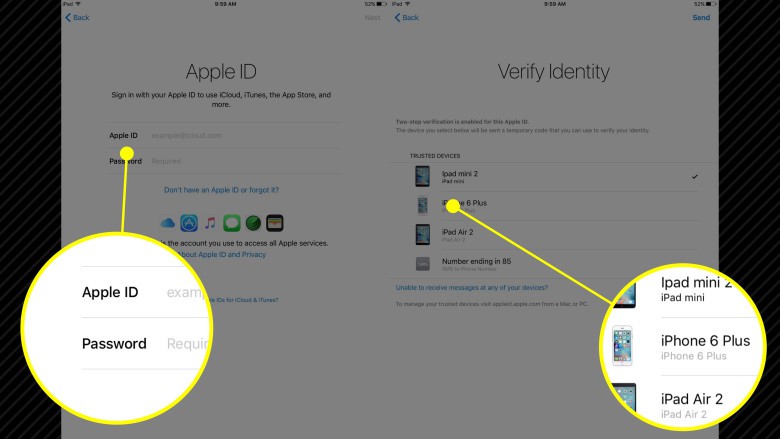
Photo: Rob LeFebvre/Cult of Mac
Choosing Set Up as New iPad will get you to an Apple ID screen. Enter in your Apple ID and password here. If you’ve got Two-Step Authentication set up on your Apple ID, you’ll need to verify your identity with a trusted device. Apple will send your device a verification code (I use my iPhone 6 Plus) and you’ll just need to enter that code into the iPad’s screen. Once entered, agree to the Terms and Conditions twice so your iPad can continue to set up.
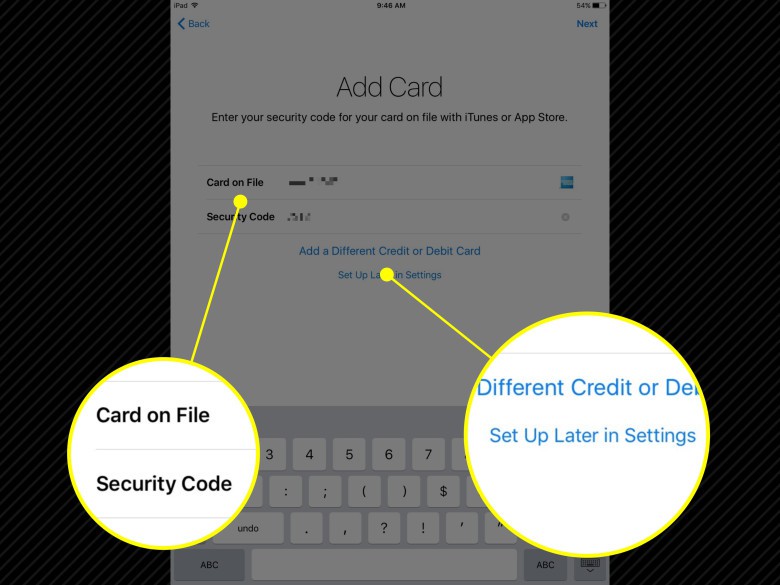
Next, you’ll have the option to set up Apple Pay. If you have an Apple Pay card set up in iCloud, tapping the Next button in the upper right corner of your iPad screen will have the following Add Card screen populated with your default Apple Pay credit card. Simply enter the Security Code where prompted. If you don’t have Apple Pay set up yet, simply enter a card in the fields provided, or tap Set Up Later in Settings.
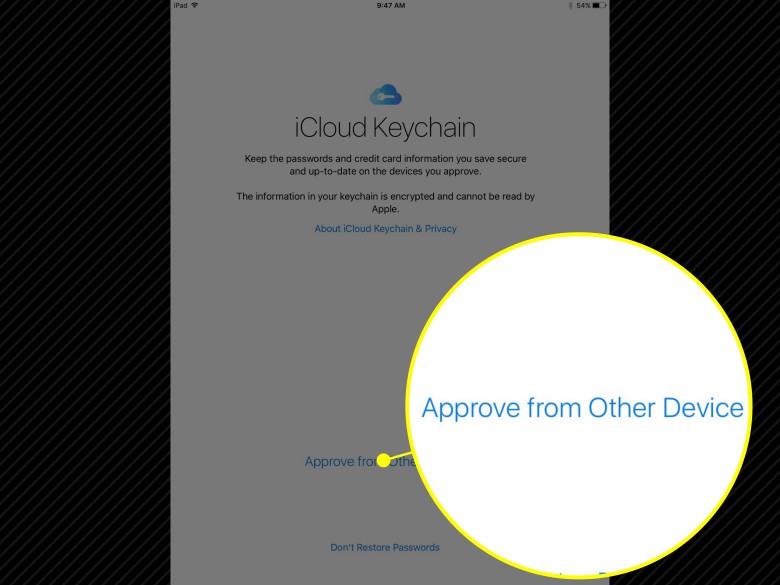
Photo: Rob LeFebvre/Cult of Mac
The following screen lets you restore any passwords you have saved in iCloud Keychain. You’ll need to approve from your other device (again, I use my iPhone), or tap Don’t Restore Passwords if you want to enter them yourself as you come across websites and apps that require them (this is the safest option). If you approve from your other device, you’ll need to enter your Apple ID password and Allow from there.
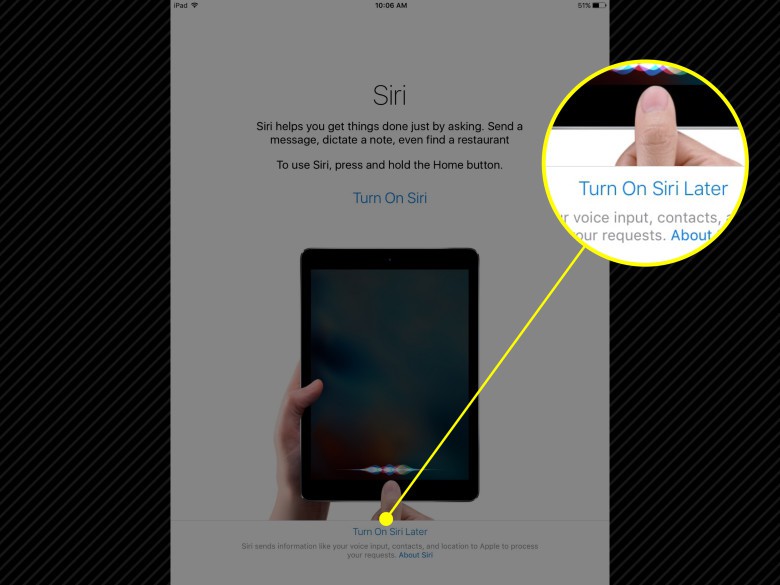
Photo: Rob LeFebvre/Cult of Mac
Siri is next, and you can enable Apple’s personal digital assistant with a tap on the Turn On Siri screen, or you can opt to Turn On Siri Later near the bottom. You can also send Diagnostics to Apple to help improve its services; I usually send them along to Apple, but some privacy enthusiasts would rather not. It’s your call. The same goes for sharing App Analytics with App Developers.
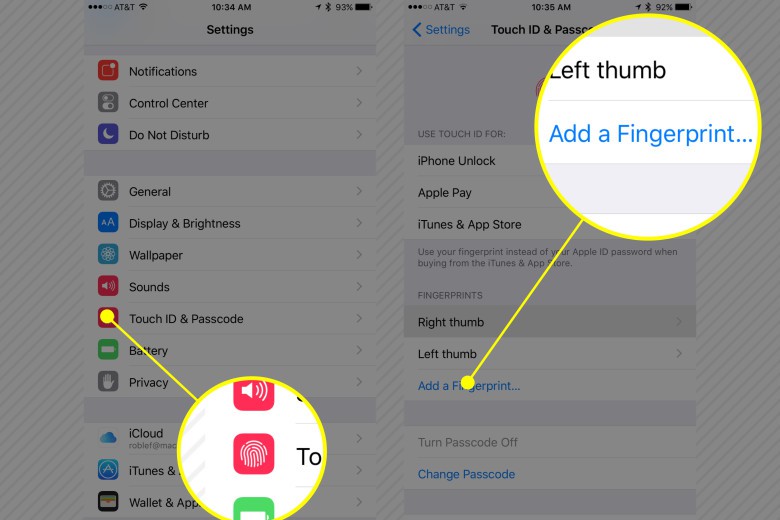
Photo: Rob LeFebvre/Cult of Mac
Add four fingers to Touch ID – Sure, you can add all of your fingers on one hand, but why? Do you really need to unlock your iPhone with your pinky? Probably not. When you set up your new device, just add the four fingerprints you’ll use the most: both thumbs and both index fingers. Tap into Settings, then Touch ID & Passcode (you’ll get a prompt to enter your numerical passcode) and then add your four fingerprints in the second section. You can even name them accordingly, with right thumb, right index, etc. Be sure to toggle iPhone Unlock, Apple Pay, and App and iTunes Stores to ON here so you can use Touch ID for everything possible. You’ll never want to type in a passcode again.
Tweaking your iPad experience
Once you tap on the Get Started link on the Welcome to iPad screen, you’ll get a prompt to add iCloud Drive to your Home screen. Go ahead and do that, especially if you already use iCloud Drive.
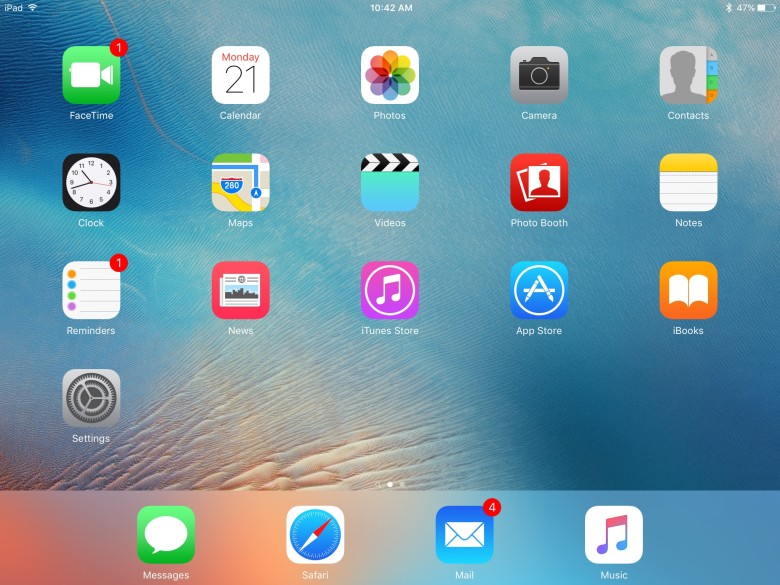
Photo: Rob LeFebvre/Cult of Mac
Once you get to your iPad’s Home screen, you’ll see all the apps included with your new iPad, including Messages, Mail, Reminders and News. Tap and hold on any icon and they’ll all start to wiggle. You can tap and drag them around your Home screen now to order them in the way you’re most happy with, or even off the right edge of the screen to put the icons on a second (or third, or fourth) page.
Taking a trip to the App Store will be next, where you’ll be able to tap the Purchased tab at the bottom and download any apps you already own for free to your new iPad. Many of the apps you’ve purchased for your iPhone have a corresponding iPad app, and will show up in the Purchased tab. Simply tap on the little cloud with the down arrow on it to get it to your new device.
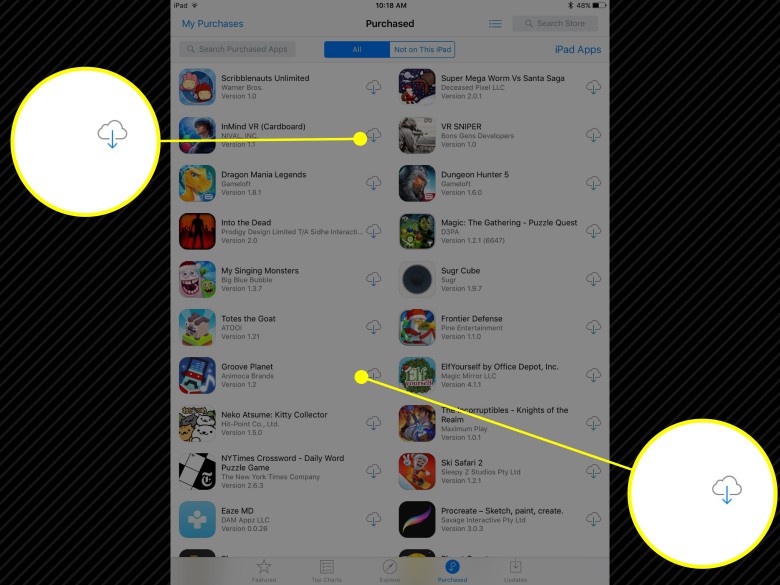
Photo: Rob LeFebvre/Cult of Mac
As for new apps, there are some essential ones you might consider getting right away, including productivity apps, social media apps, and games.
Learn how to multitask with your new iPad, including the new Split View, Slide Over, and Picture in Picture features. If you were lucky enough to get an iPad Pro, check out our list of the best creative apps to put on it right here.
Happy iPad ownership! Now you should be up and running with all the basics you need to start your new iPad life.


