Set up your new iPhone X the right way
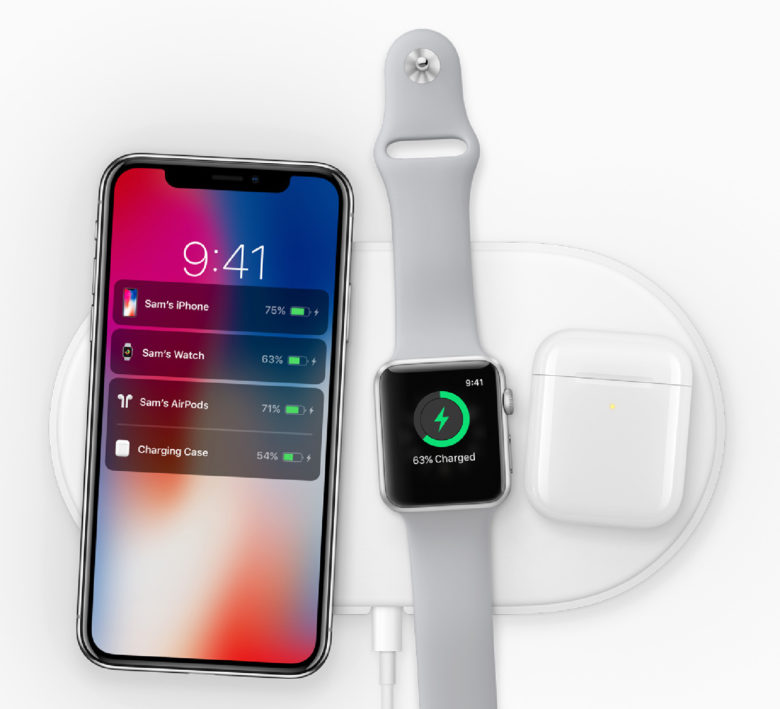
The new iPhone X is radically different from previous iPhones, but the setup hasn’t changed much at all. The biggest difference from your current iPhone, is that you’ll be able to take advantage of Automatic Setup. And of course Face ID has ousted Touch ID, so you’ll only have to save one face, instead of several fingers.
Other than that, you may find yourself on familiar ground. So lets take a look at how to set up your new iPhone X the right way.
Restoring from a backup of your old iPhone
Photo: Cult of Mac
It’s most likely that you’ll be restoring your new iPhone from a backup of your current iPhone. If that’s so, then you only have to do two things:
- Make sure you have an up-to-date backup.
- Use Apple’s new Automatic Setup feature to get you started.
Number 1. is as simple as heading to the iCloud settings on your iPhone, and checking that there is a recent automatic backup. If not, just do one manually. Head to Settings > Your Name > iCloud > iCloud Backup and tap Back Up Now. Wait until it’s done.
Automatic Setup for iPhone X and iPhone 8
Number 2. Works if both your devices are running iOS 11. Automatic Setup lets you copy across your Apple ID and home Wi-Fi setting from another device, just by bringing them close together.
If your old iPhone (or iPad) is already running iOS 11, you can put them next to each other, follow the prompts, and avoid having to type in your Apple ID and Wi-Fi passwords. This makes the initial setup much smoother.
Setting up a new iPhone X from scratch
The guide below assumes you’re setting up your new iPhone from scratch. If you don’t want to do that, you’ll definitely want to check out our how-to guide on backing up your previous iPhone via an encrypted backup in iTunes. Even if you restore a backup to your new iPhone, chances are you’ll still want to run through this list to make sure you’re getting the most out of your device.
Set up your new iPhone: the basics
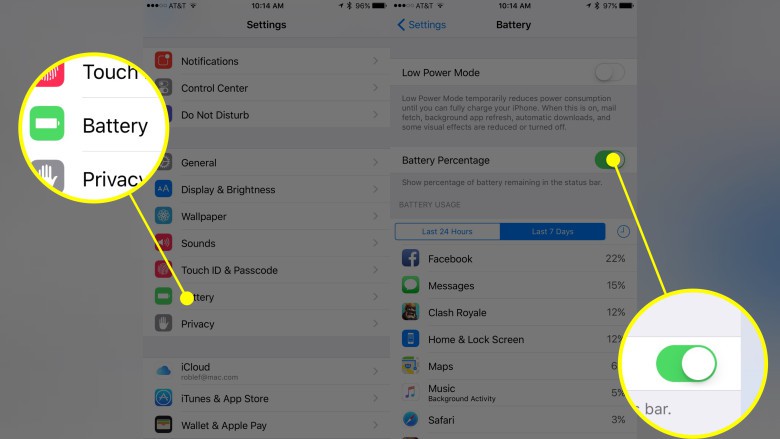
Photo: Rob LeFebvre/Cult of Mac
Re-download only the apps you need – This one is a must. We all have way too many apps on our iPhones that we just do not use. This is the big reason we do a clean set up, to be honest. Tap into the App Store app and make sure you’re signed into your Apple account (swipe down to the bottom of the Featured tab to see which account you’re signed in as). Only download apps that you’ve used in the past six months. Or, be daring: Just download stuff you use on a daily basis. We’re willing to bet it’ll be a very few.
Turn on battery percentage – Update: You don’t have this option on iPhone X because of the “notch.” You’ll need to check Control Center using the new iPhone X gesture to check battery percentage. However, this tip still applies to every other iPhone, so we’re leaving it in the setup guide.
Nothing’s better than seeing precisely how much battery you have left at a glance. Drop into Settings and tap Battery. Switch the Battery Percentage toggle to ON and never guess how much your battery has left in it again.
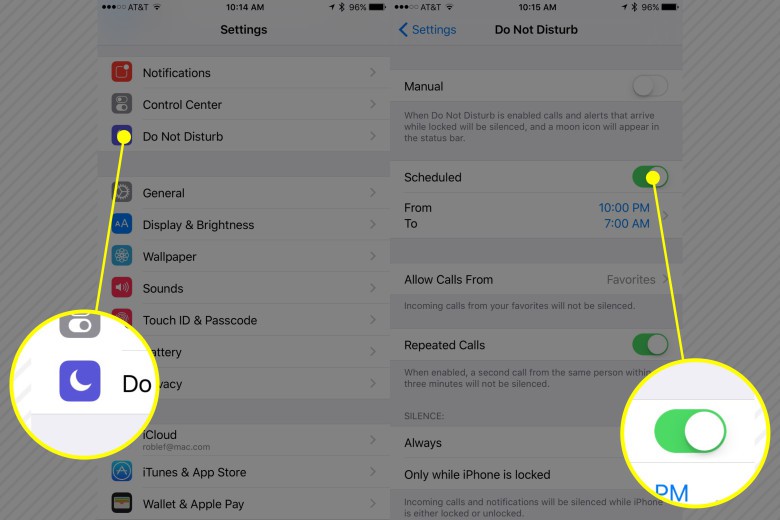
Photo: Rob LeFebvre/Cult of Mac
Set up Do Not Disturb – If you’re like the rest of us, you’re constantly getting notifications, iMessages, and other kinds of distractions up on your iPhone. Set up Do Not Disturb in the Settings app (it’s in the second section down the page, just under Notifications and Control Center). You’ll want to schedule it for times when you need to not be bothered. Toggle Scheduled to ON and then set the times you want to keep Notifications out of your face. Try 10 pm to 7 am, if you can. Pro tip: let some things through if there’s an emergency: enable Allow Calls From your Favorites, and toggle Repeated Calls to ON.
Go retro with your ringtone — Set your ringtone to something no one else will have these days: Xylophone. Tap into Settings, then tap on Sounds. Swipe all the way to the bottom of the list and tap on Classic. You’ll go to a list of all the sounds from the original iPhone, including Xylophone, which sounds to me like something out of Law and Order. There’s nothing more distinctive, and since no one else is using this old and busted ringtone anymore, you’ll know which iPhone ringing is yours immediately.
What about those old ringtones? If you purchased them from iTunes, then they’re easy to restore. Even better, why don’t you make your own ringtones using the free GarageBand app? You can start from scratch, or use any song in your music library.
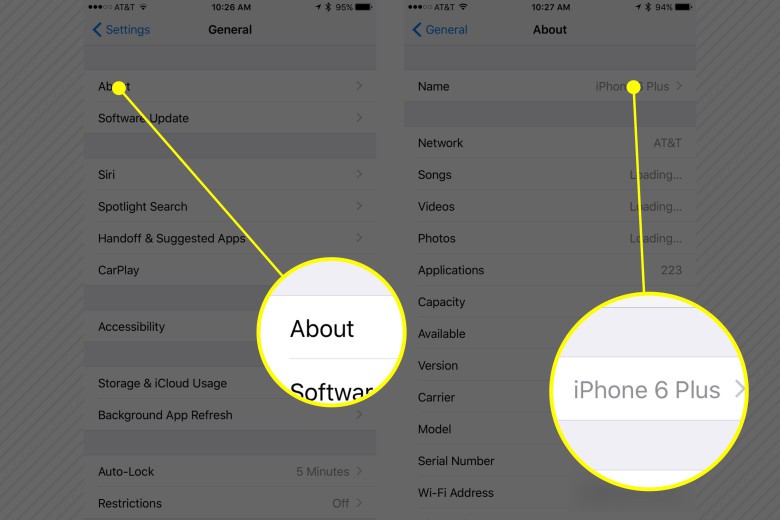
Photo: Rob LeFebvre/Cult of Mac
Change your iPhone’s name – When you’re using connected services like Find my iPhone and you have several devices, you’ll want to change the name to your new iPhone so you can figure which one to Find. Tap into Settings>General. Once there, tap into About, then tap on Name, which usually defaults to something vague. Type in iPhone 8 (or iPhone 8 Plus if that’s your jam) to make sure you know what device you’re targeting over the network.
Set up Face ID
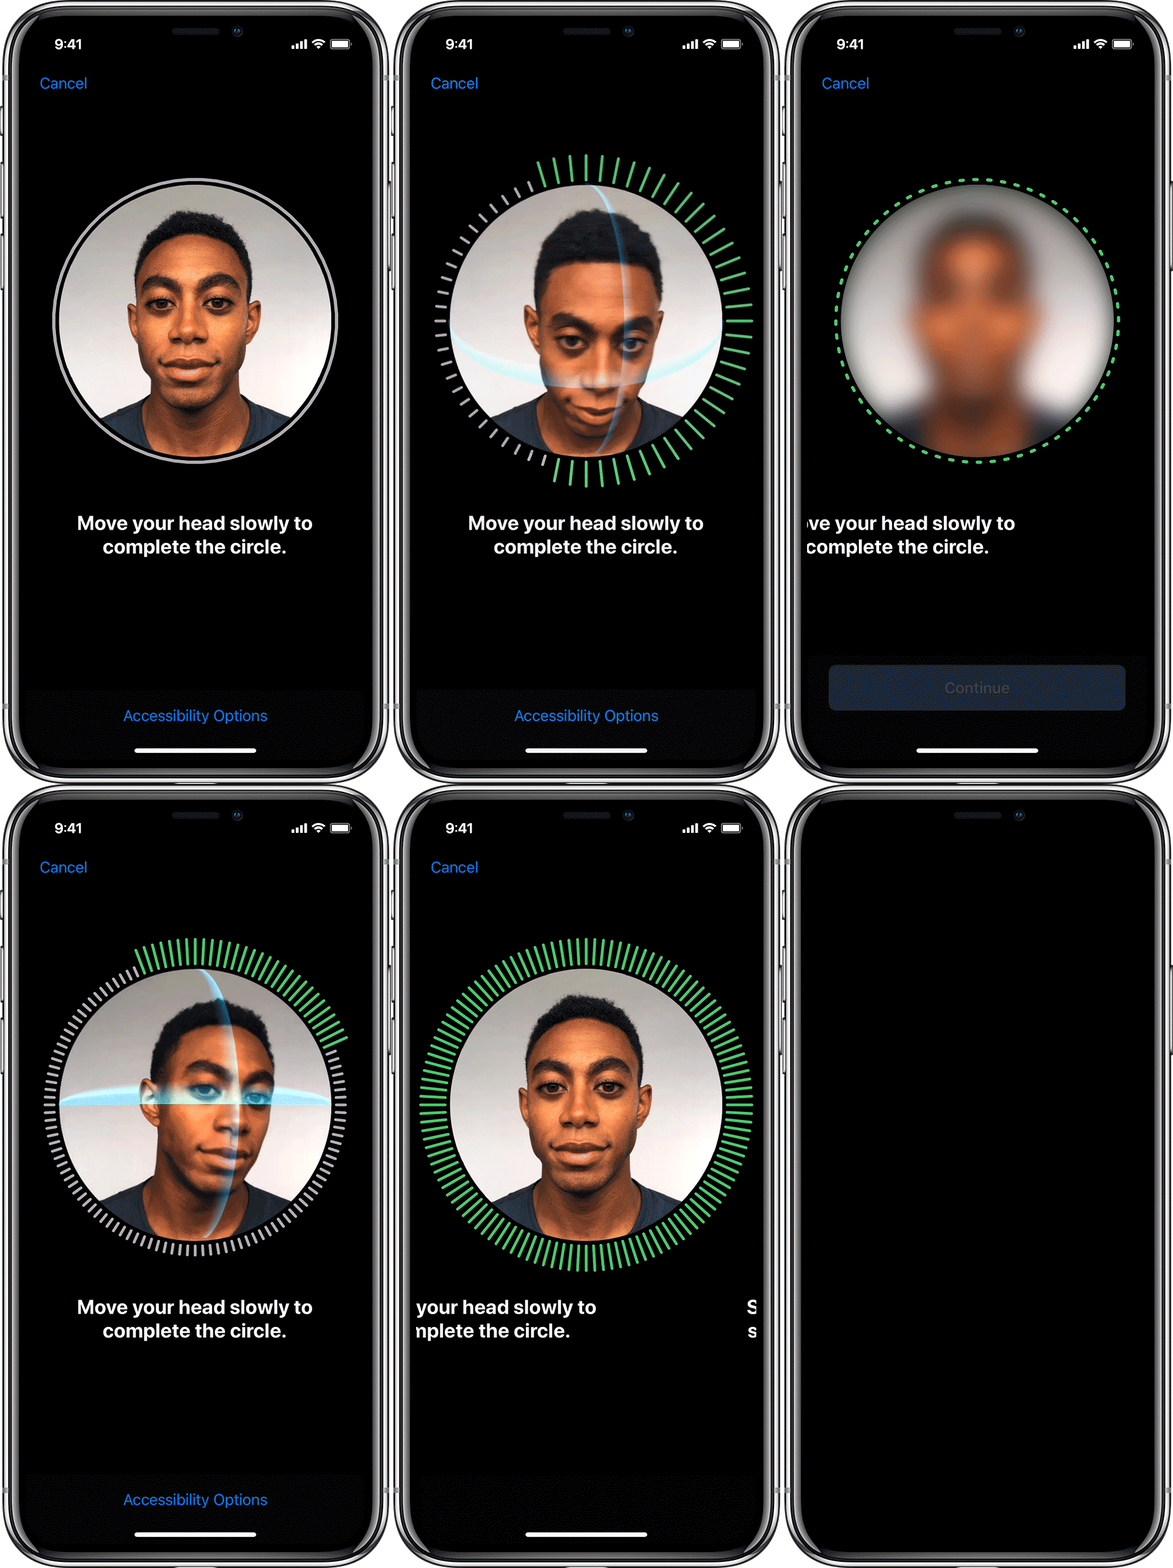
Photo: Apple
Face ID is much easier to use than Touch ID, and its also easier to set up. Instead of having to train your iPhone with your fingerprints, one by one, you just look into the camera and… that’s almost it. To set up Face ID on your iPhone, do the following when prompted during the initial setup. If you want to start over with a phone you have set up previously, head to Settings>Face ID & Passcode, and tap in your password to get started.
Setting up Face ID is a little like the compass calibration your iPhone makes you do from time to time when you use the Maps app, only instead of rolling the iPhone around, you roll your own head. You’ll need to do two scans, and then the iPhone X will have your 3D head stood in its secure enclave, inaccessible to anything, even to iOS itself (despite some ignorant clickbait “news” stories).
Now, still in Settings>Face ID & Passcode , you can choose which features to use with Face ID, just like you used to do with Touch ID.
Manage email
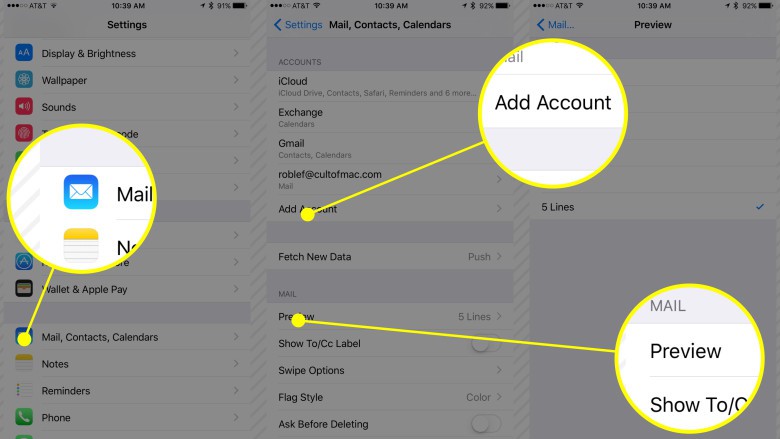
Photo: Rob LeFebvre/Cult of Mac
Add your email accounts – Whether you use Mail, Google Inbox, or something like Sparrow, you’ll want to add your email accounts right away. For Apple’s Mail app, tap Settings>Accounts & Passwords, then tap Add Account, choose your email provider (some folks still use Exchange), and follow the steps to enter all the info required.
See more preview – Mail lets you see the content of a message without opening it. Might as well see as much of it as possible, right? Tap into Settings>Mail and tap on the Preview button. Change your settings to five lines and get more info from your emails without having to tap them open.
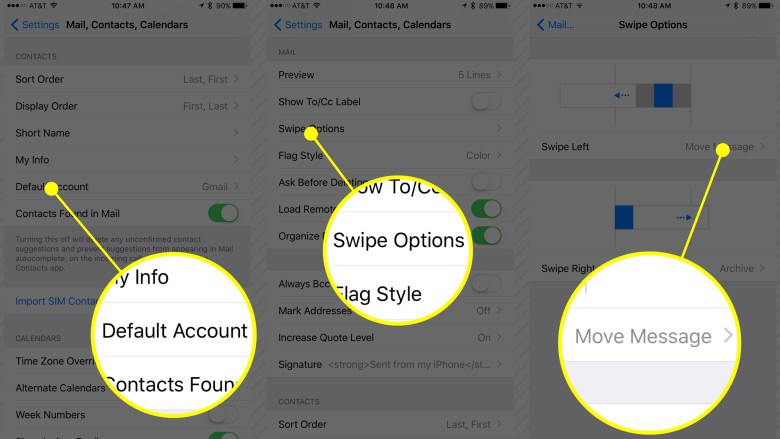
Photo: Rob LeFebvre/Cult of Mac
Set your default account – For some reason, our iOS Mail settings always seem to default to an account we never use, like iCloud. Tap Settings>Accounts & Passwords>Your mail account name, and then tap Account>Email. Once you have reached the depths of this setting, you can tap your an email address, and this is what will be used as your from address in new mails. If there is only one address in here, you’re good to go. This is also the place to add any other email addresses associated with your mail account.
Swipe to manage email – It’s much nicer to be able to swipe your emails away, rather than clicking through and tapping on several buttons. Change Swipe Right to Archive, so that when you swipe that direction, you’ll be able to either quickly save an email to your Archive, or (if your email Account supports swiping left as a default Delete action) it will offer a Trash icon. Change Swipe Left to Mark as Read, which is a great way to just slam through your email messages as you get them. This only affects your built-in Mail app from Apple; each third-party email client will do things differently.
Add an HTML signature – A nice email signature can really make you look professional, so be sure to add an HTML signature to your email. If you’ve already got one on the desktop, copy and paste the code into an email and forward to yourself. Then you can copy and paste it into Mail app (or whichever email client you prefer, if it supports it). It can be as simple as text formatting tags or as complex as adding a logo from a webserver. You can use an iOS app to make one, too, but they tend to look pretty basic or clip-art-y.
Calendars, iCloud, Messages and more
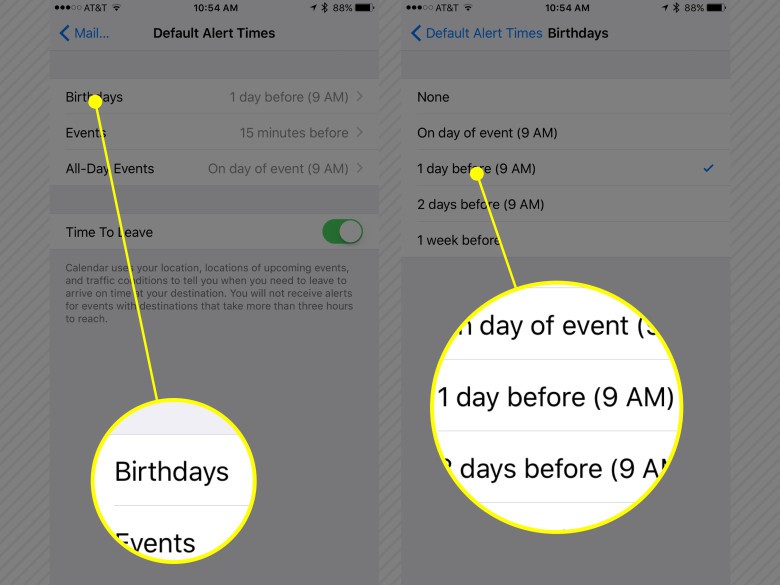
Photo: Rob LeFebvre/Cult of Mac
Set default Calendar alert times – Calendar is great for alerting you to important events, but it’s not always at a convenient or useful time. Set the default timing on three types of events: Birthdays, Events, and All-Day Events so you get reminders when they’re actually helpful. Tap into Settings>Calendars. Tap on Default Alert Times and set your Birthday reminders to one day before, your Events to 15 minutes before (or a time that makes more sense for your own brain), and all day Events On day of event (9 am), so that you’ll never miss an event again.
Background app refresh – You’ll want to be choosy about which apps you want to be able to run in the background, so take a look at the list in Settings>General>Background App Refresh. Toggle Background App Refresh to ON, then toggle OFF all the apps you don’t really need accessing anything in the background. When in doubt, toggle it to OFF and see if you are slowed down by any apps that need to refresh when you launch them. Of course, you’ll want to enable Background Refresh for Cult of Mac Magazine!
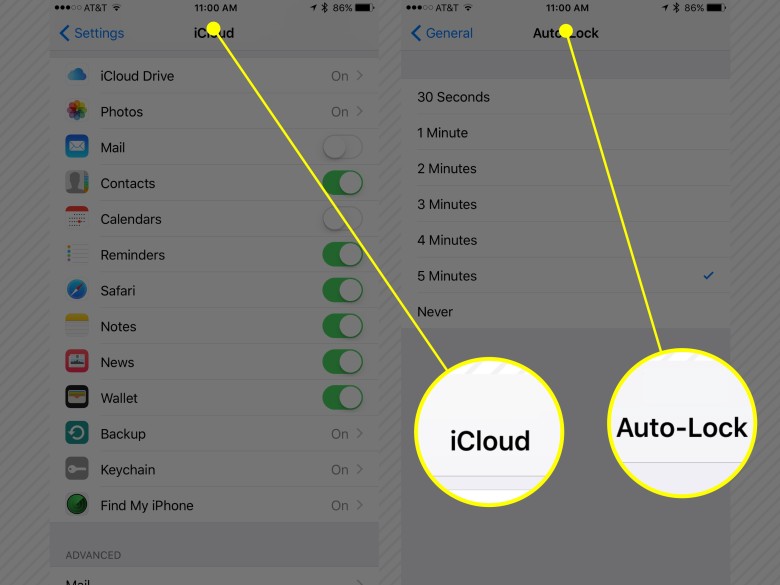
Photo: Rob LeFebvre/Cult of Mac
iCloud is everything – There’s no doubt in our minds that iCloud is the simplest, best answer for keeping all your stuff backed up and safe. Tap into the Settings>iCloud and be sure to sign in with your Apple ID. You can manage your storage in here, but be sure to enable everything you need right away so you’re never not backed up. Enable iCloud Drive, Photos, Contacts, Reminders, Safari, Notes, News, Wallet, Backup, Kechain and Find My Phone as soon as you get your iPhone 6s unpacked. You can enable Mail and Calendars if you only use Apple’s apps and services; otherwise, you can keep those toggled to OFF.
Lengthen your Auto-Lock – Let’s face it, we’re on our iPhones all the time. The default two minutes you get for the length of time your iPhone will stay on without turning off its display may keep your battery power higher longer, but it’s really not enough for anyone during normal use. Tap into Settings, General, Auto-Lock to set this to the maximum five minutes so you can stop tapping your screen all the time to keep it awake.
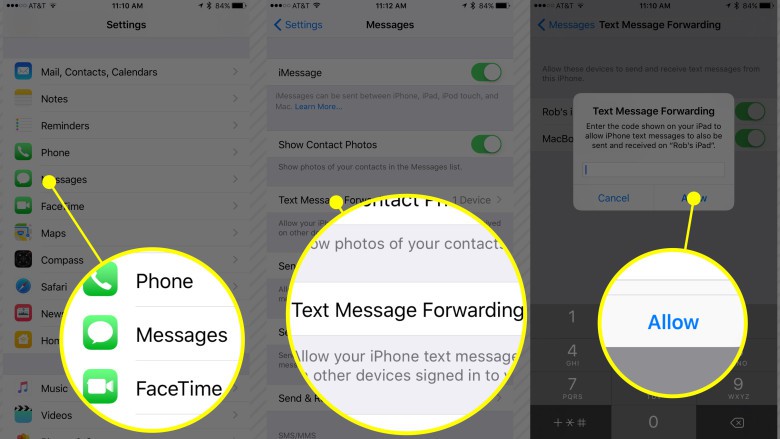
Photo: Rob LeFebvre/Cult of Mac
Get text messages everywhere – You can enable your Mac or iPad to get text messages from your iPhone, provided you’ve set up iMessage on them (Settings, Messages, toggle iMessage to ON on any iOS device, Messages Preferences on your Mac). Make sure your other device is nearby when you tap into Settings on your iPhone, then tap on Messages, then tap on Text Message Forwarding. Any devices available will show up in the list. Toggle your Mac or iPad to ON, and then check the target device for a code. Enter that code into your iPhone, and now all your devices will get not just iMessages, but also Text Messages from those not using iMessage.
Equalize your tunes – Turn on the EQ in your Music app so that you can hear your favorite jams without having to hassle with a bluetooth speaker. Launch Settings>Music. Once there, tap on EQ and set your iPhone to Late Night. This will give you a great volume boost for those times where you just want to blast The Clash while you make a quick dinner in the kitchen.
Secure your web experience
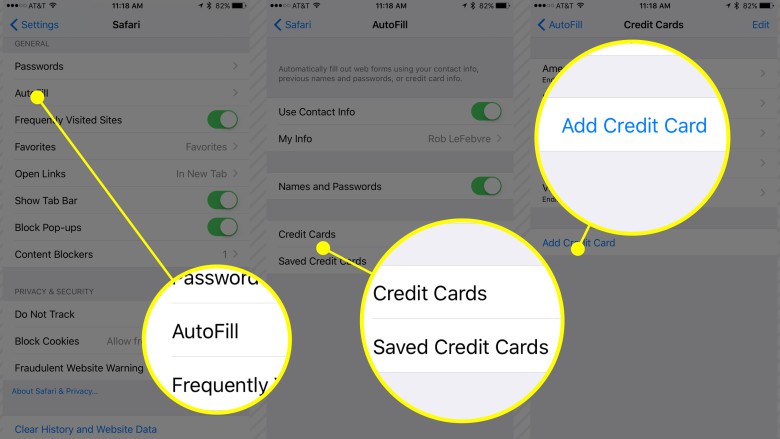
Photo: Rob LeFebvre/Cult of Mac
Safari setup – Surfing the web is full of forms to fill out; adding your name, address, email, and credit cards can take up a lot of your time. Be sure to head into Settings> Safari> AutoFill to set up your mobile browser the right way: toggle Use Contact Info to ON, and then tap on My Info to pick the Contact you want to use when you encounter any form fields in Safari. Toggle Names and Passwords to ON, as well, so you can save that across visits to the same website (this pulls from iCloud Keychain, so be sure to have that enabled). Toggle Credit Cards to ON, as well, so you can shop with abandon; just be sure to use only SSL encrypted websites. ProTip: Manage which credit cards your iPhone will save with a tap on Credit Cards. You can Add new cards in there, or Delete ones that no longer work or that you don’t want to use via mobile Safari.
Safari in iOS 11 also blocks cross-site tracking, aka. those cookies that follow you around and let online stores place the same ads on every subsequent page you visit. This is on by default, so you don’t need to do anything. Just sit back and enjoy your newfound privacy.
Services to subscribe to
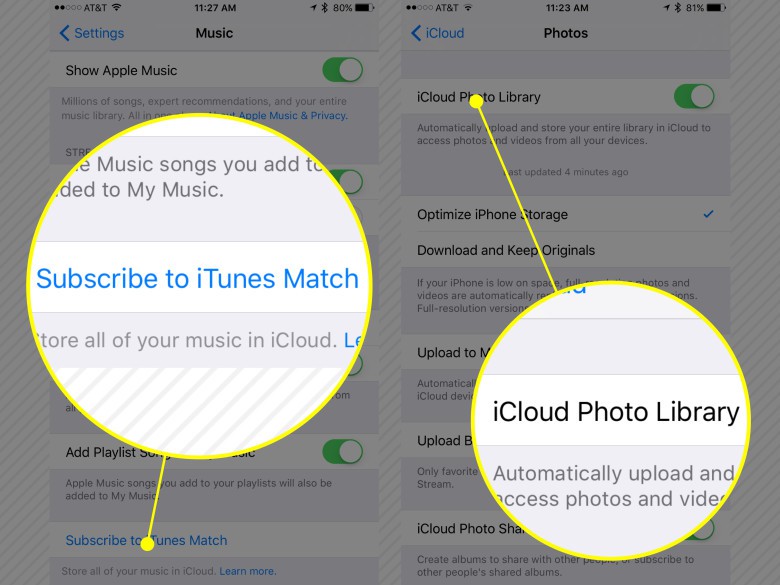
Photo: Rob LeFebvre/Cult of Mac
Enable iCloud Photo Library – We love iCloud Photo Library; it keeps your photos and videos safely stored in the cloud and let you retrieve full-quality copies of your files in case you misplace (read: trash) your originals. iCloud Photo Library relies on your iCloud storage, so if you have a lot of photos, you’ll want to bump that up. Tap into Settings, then iCloud, then tap on Photos to toggle iCloud Photo Library to ON. Note that this will turn My Photo Stream OFF. If you want both, you’ll need to re-toggle Photo Stream ON.
Use iTunes Match – Sure, Apple Music keeps track of all the music files on your devices, but if you delete them from your iPhone and don’t have a backup elsewhere, you’re going to have to settle for whatever quality Apple Music will give you when you listen. If you want to keep your full-resolution music files backed up to the cloud, use iTunes Match. You get all your music files matched or uploaded to iCloud in the highest bitrate possible. You can then stream or download the music to any device provided your iTunes Match subscription is intact. Never be without your tunes (or have an over-filled iPhone) again. Tap into Settings, tap on Music, and then tap on Subscribe to iTunes Match to get this valuable service enabled on your new iPhone.
All set up? Time to accessorize
Now that you’ve got your device ready to use, you’ll need some accessories to take advantage of all of the amazing features, like wireless charging.
Apple’s AirPower charger won’t be out until next year, but we’ve rounded up the best wireless charging options for the iPhone X and iPhone 8.
Even if you bought AppleCare+ you should definitely consider getting a case for that $1,000 iPhone. Manufacturers are already churning out a bunch of great iPhone X cases. Check out our list of the best iPhone X cases you can buy right now.
Note: This post was updated on Nov. 3, 2017. Rob LeFebvre contributed to this post.


